Let’s start with what should be obvious. Winches can be dangerous. This one piece of equipment, if used incorrectly or without proper safety precautions, can injure – or even worse, kill you or someone around you.
I’ve seen some bad recovery situations out on the trail made exponentially worse by folks who improperly rig their winch lines, extract a vehicle using factory tie-down points – instead of frame-mounted tow points, and those that have a general disregard for safety measures in a winching situation.
I’ll give you some very high-level tips in this article but let’s be crystal clear, reading this piece is not enough for you to get out and start using your winch. Please take a class (or better yet, classes – plural) from certified instructors who have spent many hours honing their craft and know (and, more importantly, can teach) proper winch safety. If you’re looking for a great way to learn winching techniques, buy yourself an Overland Experience training ticket and take classes at an Overland Expo near you.
Buying a Winch
There are so many great winches on the market today that you’d be safe with just about any winch from any reputable company. You’ll need to consider a couple of criteria before pulling the trigger on that big purchase. Number one, what vehicle are you installing the winch on? An 8000-lb. winch is not going to be any good for a 10,000-lb. truck.
A good place to start is to find out your vehicle’s Gross Vehicle Weight (GVW) – this is usually noted on the plate attached to the edge of the driver’s door. This weight DOES NOT include any modifications, including bumpers, drawer systems, or anything that you’ve bolted onto your rig. To get an accurate GVW, find a public scale near you and drive down to get your truck weighed fully loaded.
Read More: How-to: Overlanding without a Winch
Once you have that number, add about 30-50% to that weight. Say your fully loaded truck weighs 6,000 lbs. You’ll want a winch that’s rated to at least 9,000 lbs. If you think you’ll be recovering not just yourself but larger vehicles as well, you’ll want to go for a heavy-duty winch capable of pulling 12,000 – or 15,000 lbs.
Here are a couple of winches for your consideration.
Warn ZEON 12-S Recovery 12000-lb Winch
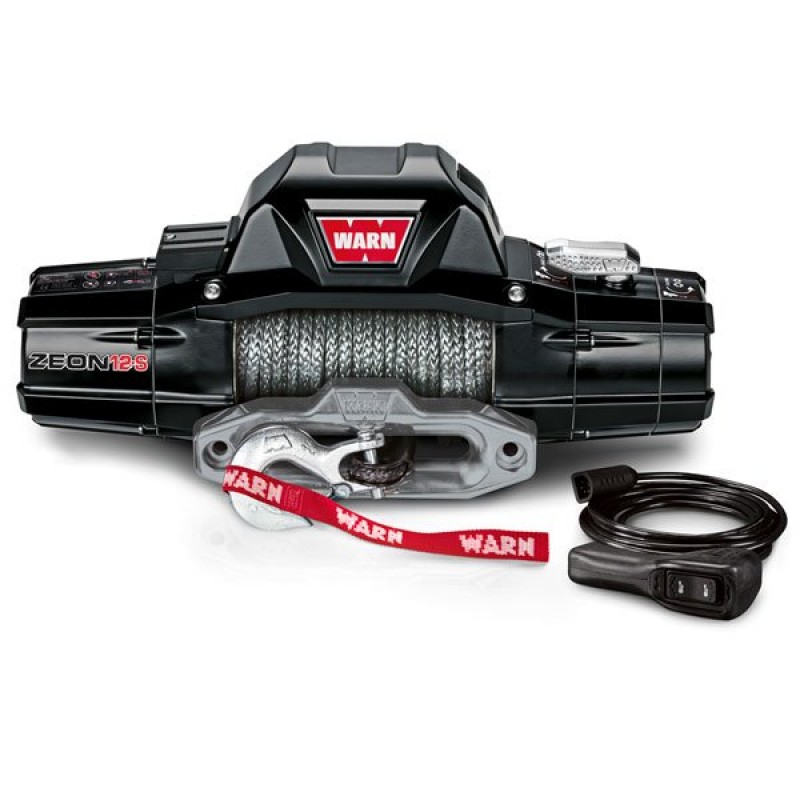
The WARN ZEON has proven itself in the field and among overlanders. Now you can get the 12,000-pound capacity ZEON winch with Spydura Pro synthetic rope instead of steel cable. The new ZEON 12-S winch trims weight but keeps plenty of muscle for the big jobs and the toughest rescues. And the light, easy-to-handle synthetic rope makes any winching situation a bit easier. It’s the perfect choice for heavily loaded off-road vehicles.
MSRP: $1,689.99
SuperWinch LP10000 12V Wire Rope Winch
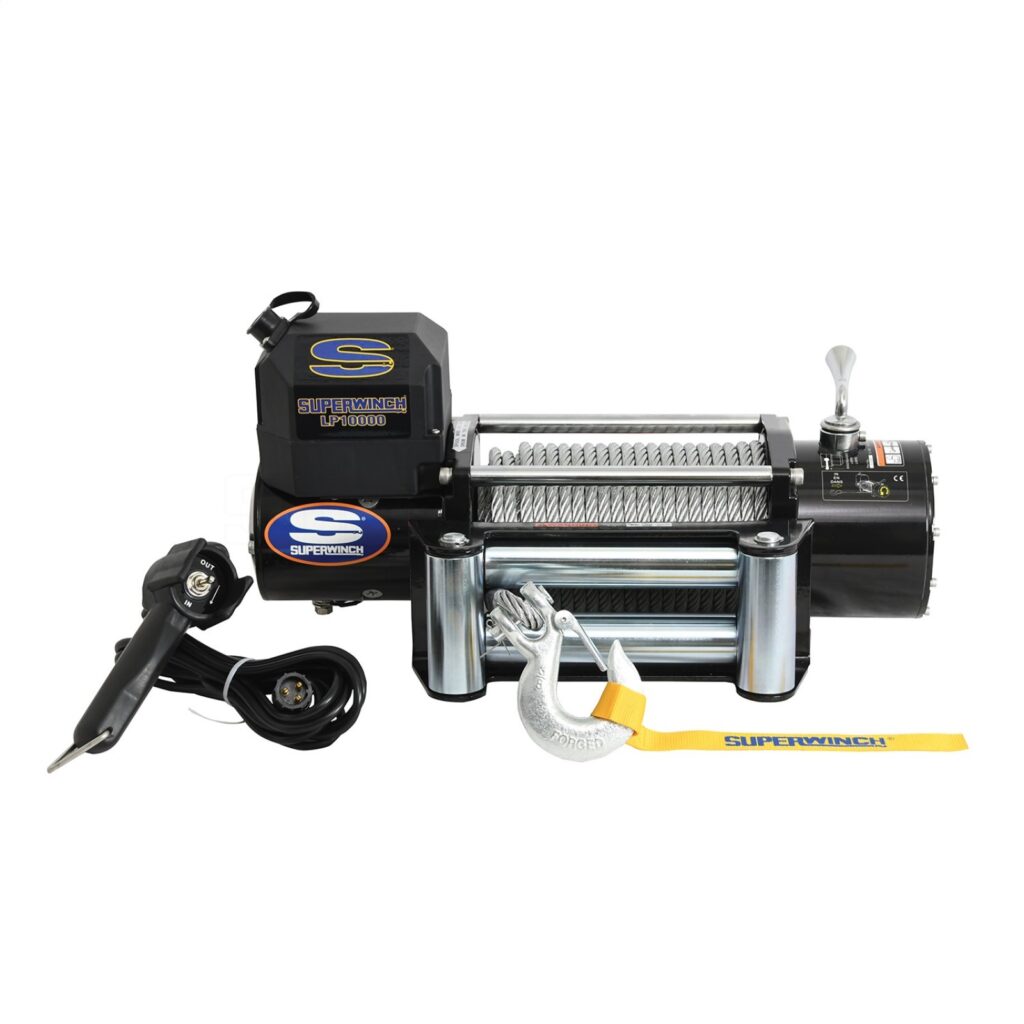
The Superwinch LP10000 provides heavy-duty features at an affordable price. The LP10000 features many of the standard features found on much more expensive 10,000 lbs winches, including a 5.1 HP sealed motor and upgraded components, such as a weather-resistant roller fairlead, clevis-pinned latched hook, and sealed solenoid with integrated circuit breaker.
MSRP: $678.99
The Key to Winch Safety is a Good Recovery Kit
Don’t skimp on proper recovery gear. Any recovery kit worth its weight will have working load limits (WLL) and minimum breaking strength (WBS) printed on the equipment. High-quality recovery gear will also print serial numbers and manufacture dates so you know how long you’ve had each piece of gear. Like a gallon of milk, recovery gear has an expiration date and should be replaced on a schedule depending on how often you use it or if you notice fraying or excessive wear.
So, what’s in a recovery kit? Every kit is different, but the kit you buy for your winch might have the following equipment in it; soft shackles, galvanized bow shackles, a sling or tree strap, a winch extension rope, a dampener, gloves, and a carry bag.
You’ll want to keep your recovery kit in a very accessible place, considering this kit is your lifeline in a sticky situation. Don’t store your recovery kit in a drawer in the back of your rig – what if you slide off a trail and the rear of your vehicle is wedged against a tree or a rock – how would you access your gear?
Don’t know where to start with recovery kits? Here are a couple of off-the-shelf kits that will get you started. Remember that as you progress, you’ll find pieces that work better for you than others. Not every off-the-shelf kit works for everyone. You’ll want to add a pair of high-quality gloves and protective eyewear to your kit as well.
ARB Essentials Recovery Kit
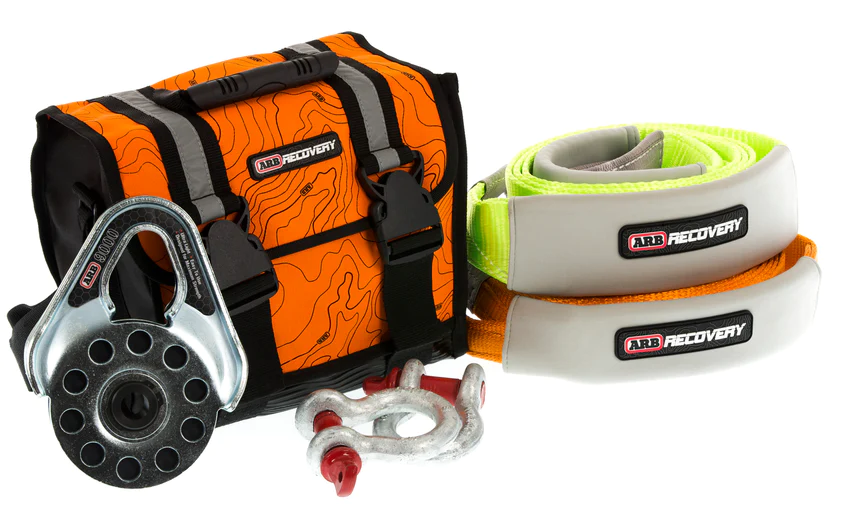
The ARB Essentials Recovery Kit contains everything you need to get off-road, including a tree trunk protector, snatch strap, bow shackles, and snatch block. With an ARB recovery kit and recovery essentials, you have the peace of mind of carrying a purpose-built recovery bag filled with a selection of items that will come in handy the next time you get stuck.
MSRP: $332.00
Warn Epic Accessory Kit

This Warn Heavy-Duty Epic Recovery Kit features the right gear to help get you out of tight off-road situations. This kit includes premium Warn Epic shackles, a tree trunk protector, a snatch block, a recovery strap, and gloves. The components fit neatly inside the modular backpack, which also acts as a winch line damper and is easy to transport. This kit is designed for winch capacities of up to 18,000 lbs.
MSRP: $591.99
Read More: Editors’ Choice: Overland Recovery Gear and Devices
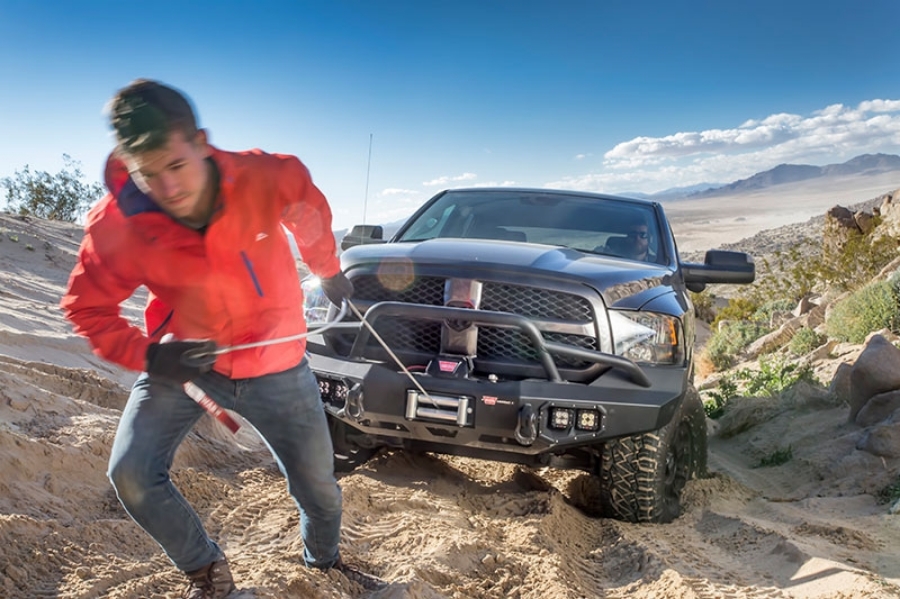
Basic Winching Techniques & Tips
Once you have a winch and the properly rated gear, you’re ready to start winching. Again, don’t even think about doing this until you’ve had some training. I can’t stress enough how dangerous a winch cable under load can be. If you don’t have access to training, try to go on trips with people with some vehicle recovery experience and learn from them. Don’t wait until you need to extract yourself to read up on proper techniques.
Assess the Situation
You’re stuck. Before you leave your vehicle, make sure you put the vehicle into “Park” and engage the emergency brake. If you’re on a hill, chock the downhill tires to prevent rollaways.
Get out of your vehicle and take five or ten minutes to take a deep breath and look around you. Assess the area. If you’re alone on the trail, are there trees nearby that you can use as an anchor point? How about large boulders? What does the area look like from your vehicle to your anchor point? Are there sharp rocks or a stone shelf that could abrade your rope? If you’re with other people with vehicles, do they have a winch of their own? Where are they in relation to your vehicle? In front? Behind? Before you ever take your recovery kit out of the vehicle, you should know which type of pull you’re doing and how you’re planning to rig your winch.
My favorite piece of advice that I received is to make a cup of tea, eat something, and think things through. You’re not going to get unstuck in the ten or fifteen minutes it will take you to make tea and consider all of the possibilities. You’ll also be in a far better mood.
Rigging Your Winch
First things first. Put on your gloves and protective eyewear. Winches have pinch points that can crush or sever fingers. Always be aware of where your fingers are in relation to the winch drum and fairlead area. As you’re spooling out your rope or cable, always inspect it for fraying, kinks, or other damage. If your line is damaged, don’t use it.
All winch pulls should be in a straight line from the vehicle to the anchor point to minimize the bunching of rope or cable at one end of the winch drum. Given this information, you’ll need to know if you are doing a single-line, double-line, or triple-line pull.
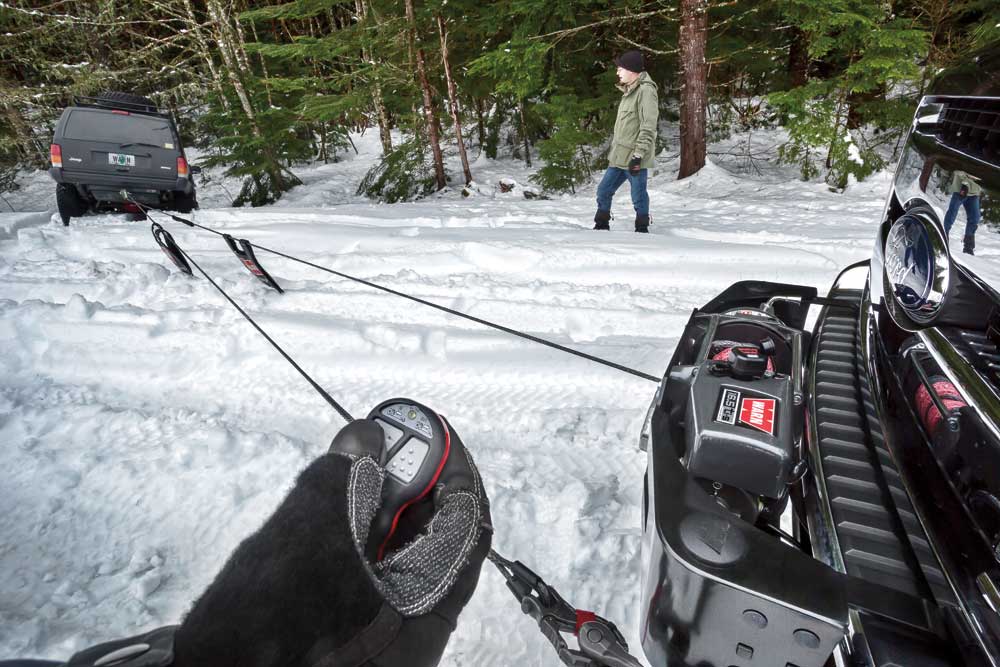
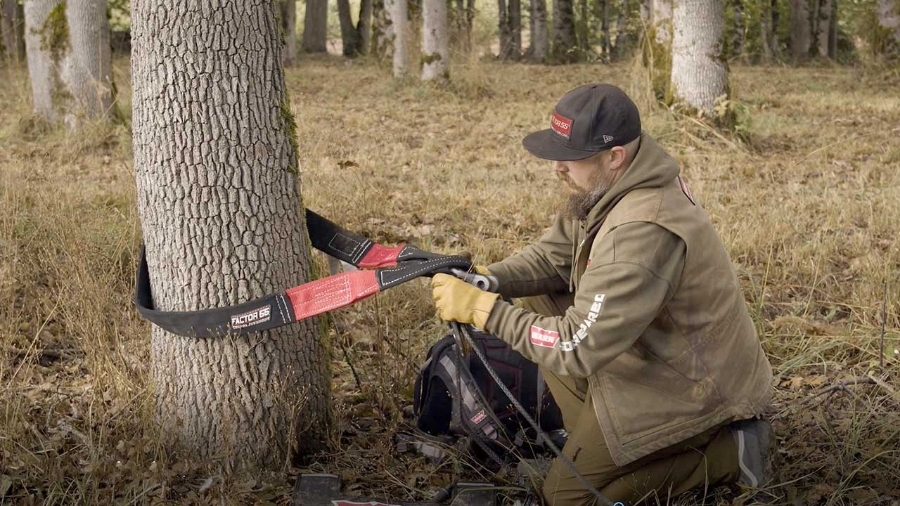
A single-line pull is the easiest; Put on your gloves and eye protection, unspool your winch line, and drag it to the nearest anchor point – whether that’s a tree trunk (always use a tree protector), a large boulder, or another vehicle with anchors attached to the frame. Secure your winch line with a strap, a shackle (either soft or metal), or both. Lock the clutch on your winch, and either use the controls on the winch or on a remote to slowly place the line under tension. Use a dampening mat, coat, or blanket draped over the line to prevent it from flying if it snaps. Get behind the wheel of your vehicle or behind the door and use slow, controlled pulls to extract your vehicle. Before you begin another pull, check to see what your vehicle is doing and readjust as necessary. This is not a race – go as slow as possible and as fast as necessary.
A double-line pull is similar, but you’ll employ the aid of a snatch block (or pulley) to provide more pulling power. Your winch line will go to the first anchor point, where you’ll attach a strap and a snatch block. You will then run your line through the snatch block and back to a frame-anchored point on your vehicle. Use the same safety measures from the description of the single-line pull above. Using this method doubles your pulling power – e.g., an 8,000-lb. winch can pull 16,000 lbs., but your rope length and line speed are halved.
If you’re really stuck, you may want to triple your pulling power with a triple-line pull. Similar to the double line, your winch line will go to the first anchor point, where you’ll attach a strap and a snatch block. You will then run your line through the snatch block and back to a frame-anchored point on your vehicle, where you’ll run your line through a second snatch block and feed your line through to another anchor point. Use the same safety measures from the description of the single-line pull above.
Be aware that there are many situations, trail types, and weather conditions that will require you to change angles, use other vehicles or anchor points, and use workarounds for rigging. The most important thing is to always use your winch with proper safety measures in place and treat any winch pull under load as potentially hazardous.
Clean Up and Prepare for the Next Recovery
Once you’re on solid ground, put your vehicle in Park, and engage the emergency brake. Turn off the power to the winch and disengage the clutch. Spool out some line from your winch and allow the line to hit the ground. Please remember that even though it is loose, this line is still live until you disengage the line from your anchor point. If the vehicle shifts at all, this line could tighten up again and cause injuries, so always treat it as a live line. Disengage any snatch blocks, shackles, and rigging you may have used, and roll them back up and stow them in your recovery kit. Reengage the clutch and spool your winch line very slowly back onto the drum. When you get within three feet of the fairlead, watch your fingers, so they don’t get caught as the hook makes contact with the fairlead. One last time on the remote should snug your hook to the fairlead and stop it from rattling around. Put your gloves and eyewear back in their spot for the next use.
Getting stuck is no fun, but it can be a great learning experience. Being self-sufficient while you’re in the backcountry includes learning everything you can about recovery techniques so when you do get stuck, you’re ready.